chapter 10. 이미지 경계선 찾기 및 그리기
Contour란 같은 값을 가진 곳을 연결한 선으로 주로 지도에서 같은 높이를 가진 지점을 연결한 등고선이나 같은 기압을 연결한 등압선 등의 예시가 있다. 이미지 프로세싱에서 Contour란 동일한 색 또는 동일한 색상 강도를 가진 부분의 가장 자리 경계를 연결한 선이다. 주로 물체의 모양이나 객체를 인식하기위해 주료 활용되는 도구임. 보다 정확한 인식을 위해 주로 바이너리 이미지를 사용하며, Contour를 찾기전에 전처리로 Threshold나 Canny edge detection을 적용한다.
OpenCV에서 FindContours는 검정색 배경에서 흰색 물체를 찾는 것으로 찾고자 하는 대상을 흰색으로 만드는 것이 중요!
FindContours
//OpenCV
void cv::findContours	(
    InputArray 	image,              //Source an 8-bit single-channel image.
    OutputArrayOfArrays contours,   //Detected contours. Each contours is stored as a vector of points.
    OutputArray hierarchy,          //Optional output vector. containing information about the image topology.
    int 	mode,               //Contour retrieval mode
    int 	method,             //Contour approximation method
    Point 	offset = Point()    //Optional offset by which every contour point is shifted.
)

//OpenCVSharp
public static void FindContours(
	InputOutputArray image,
	out Point[][] contours,
	out HierarchyIndex[] hierarchy,
	RetrievalModes mode,
	ContourApproximationModes method,
	Nullable<Point> offset = null
)
RetrievalModes
- CCOMP : 이미지에서 모든 contour를 추출한 후, 2단계 contour 계층 구조로 구성함.
- EXTERNAL : 이미지의 가장 바깥쪽의 contour만 추출
- LIST : contour간 계층구조 상관관계를 고려하지 않고 contour를 추출
- TREE : 이미지의 모든 Contour를 추출하고 Contour간 상관관계를 추출
ContourApproximationModes
- NONE : contour를 수겅하는 모든 점을 저장함
- SIMPLE : 수평, 수직 및 대각선 부분을 압축하고 끝점만 남김. 예를들어, 직사각형 윤곽선은 4포인트로만 저장함
- TC89L1 : Tech-Chin 근사화 알고리즘 중 하나를 적용 (C-H Teh 및 Roland T. Chin. 디지털 곡선의 지배점 탐지.)
- TC89KCOS : Tech-Chin 근사화 알고리즘 중 하나를 적용 ((C-H Teh 및 Roland T. Chin. 디지털 곡선의 지배점 탐지.)
DrawContours
잠시 DrawContour에 대해 알고 넘어가자. 반복문을 사용하여 Contour index로 접근, 각 contour를 그릴거나, 혹은 contouridx 값을 -1로 지정하여 전체를 그릴 수 있다.
//OpenCV
void cv::drawContours	(
    InputOutputArray 	image,      //Destination image.
    InputArrayOfArrays 	contours,   //All the input contours. Each contour is stored as a point vector.
    int 	contourIdx,             //Parameter indicating a contour to draw. If it is negative, all the contours are drawn.
    const Scalar & 	color,          //Color of the contours.
    int 	thickness = 1,          //Thickness of lines the contours are drawn with. If it is negative, the contour interiors are drawn
    int 	lineType = LINE_8,      //Line connectivity
    InputArray 	hierarchy = noArray(),  //Optional information about hierarchy. It is only needed if you want to draw only some of the contours
    int 	maxLevel = INT_MAX,     //Maximal level for drawn contours. If it is 0, only the specified contour is drawn. If it is 1, the function draws the contour(s) and all the nested contours. If it is 2, the function draws the contours, all the nested contours, all the nested-to-nested contours, and so on. This parameter is only taken into account when there is hierarchy available.
    Point 	offset = Point()        //Optional contour shift parameter. Shift all the drawn contours by the specified offset=(dx,dy).
)

//OpenCVSharp
public static void DrawContours(
	InputOutputArray image,
	IEnumerable<Mat> contours,
	int contourIdx,
	Scalar color,
	int thickness = 1,
	LineTypes lineType = LineTypes.Link8,
	Mat hierarchy = null,
	int maxLevel = 2147483647,
	Nullable<Point> offset = null
)
Findcontours 예제 소스
 // Image를 먼저 로드한다. dst 전역에 저장

Mat gray = new Mat();
Mat edge = new Mat();

//convert to gray
if (src.Channels() == 3)
{
    Cv2.CvtColor(src, gray, ColorConversionCodes.BGR2GRAY);
}
else src.CopyTo(gray);

//edge - canny
int threshold1 = (int)numericUpDownCannyThreshold1.Value;
int threshold2 = (int)numericUpDownCannyThreshold2.Value;
Cv2.Canny(gray, edge, threshold1, threshold2);

//to get better contour
//Cv2.Dilate(edge, edge, new Mat(), null, 3);
//Cv2.Erode(edge, edge, new Mat(), null, 1);

//find contours
Point[][] contours;
HierarchyIndex[] hierarchyIndexes;
Cv2.FindContours(
    edge,
    out contours,
    out hierarchyIndexes,
    mode: RetrievalModes.External,
    method: ContourApproximationModes.ApproxSimple);

//
if (contours.Length == 0)
{
    MessageBox.Show("Couldn't find any object in the image.");
}
else
{
    //draw contours - default all
    Cv2.DrawContours(dst, contours, -1, Scalar.Green, 2);

    //display option
    string msg = "Found contours : [" + contours.Length.ToString() + "]";
    Cv2.PutText(dst, msg, new Point(5, 35), HersheyFonts.HersheyComplex, 1.0, Scalar.Red, 1, LineTypes.AntiAlias);
}

using (new Window("edge", WindowMode.AutoSize, edge))
using (new Window("contours", WindowMode.AutoSize, dst))
{
    //Wait until user finishes (space or esc)
    while (true)
    {
        int c = Cv2.WaitKey(20);
        if ((char)c == 27 | (char)c == 32)
        {
            Cv2.DestroyAllWindows();
            break;
        }
    }
}
몇가지 확인 사항이 있다, 결과 화면을 먼저 보자.
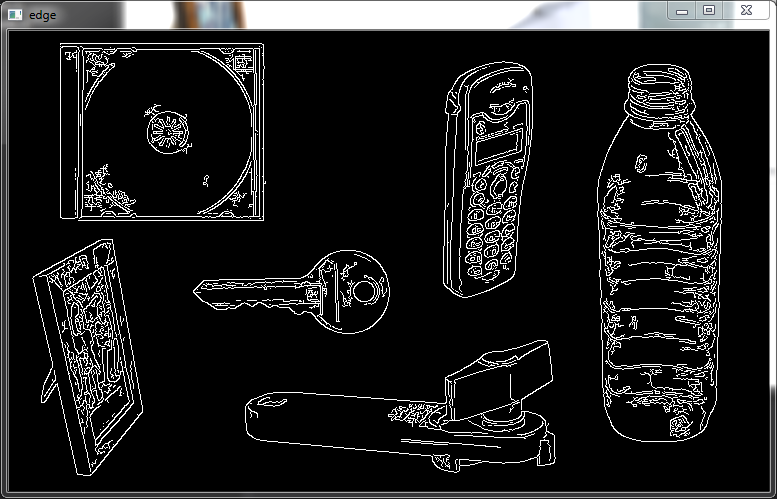
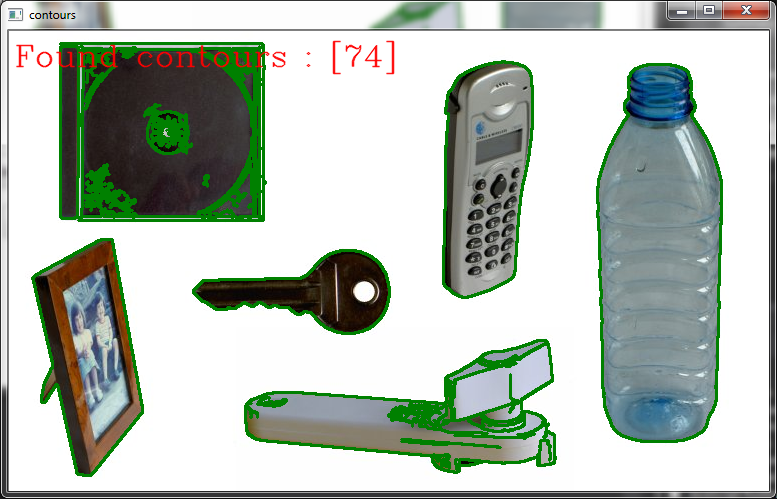
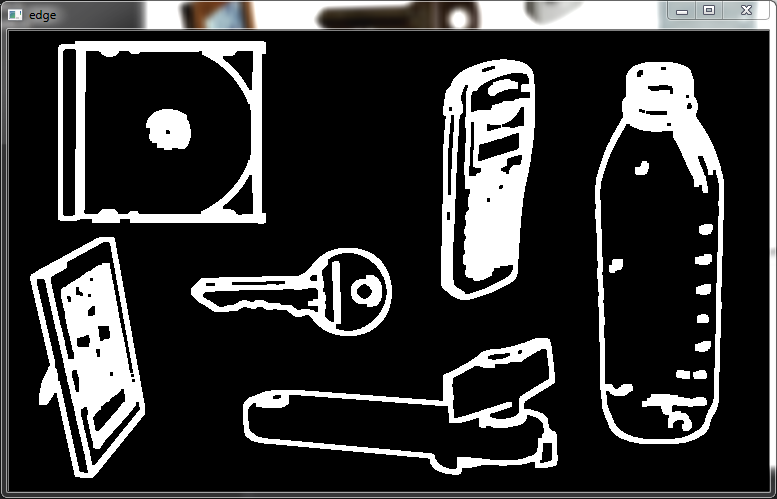
결과 화면을 보면 총 74개의 Contour를 찾은 것을 알 수 있다. 참고로 Canny edge 함수 인자로 (10, 100)을 사용 하였다.
이번엔 처음 이미지롤 로드 한 후에 Gausian blur 처리를 먼저 실행해보자.

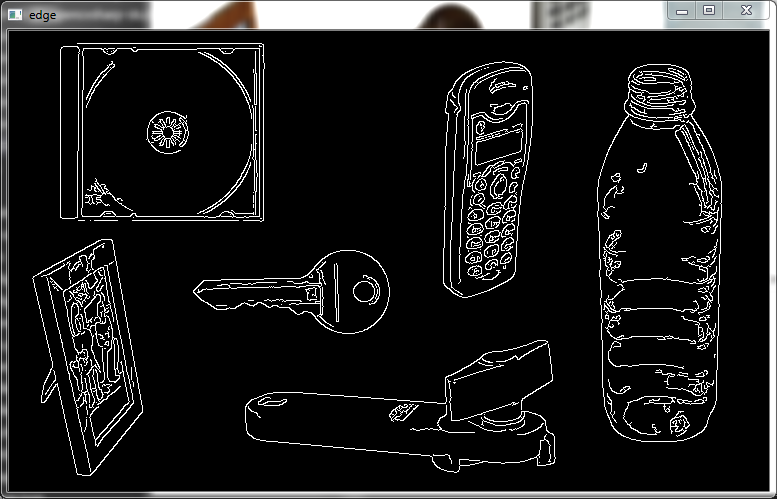

이번에는 34개를 찾았다. Blur 적용 여부에 따라 차이가 많이 나타난다.
추가로 좀더 정리된 결과물을 위해 Canny edge 인자 값을 수정(Canny edge (50, 180) 적용) 해보자.
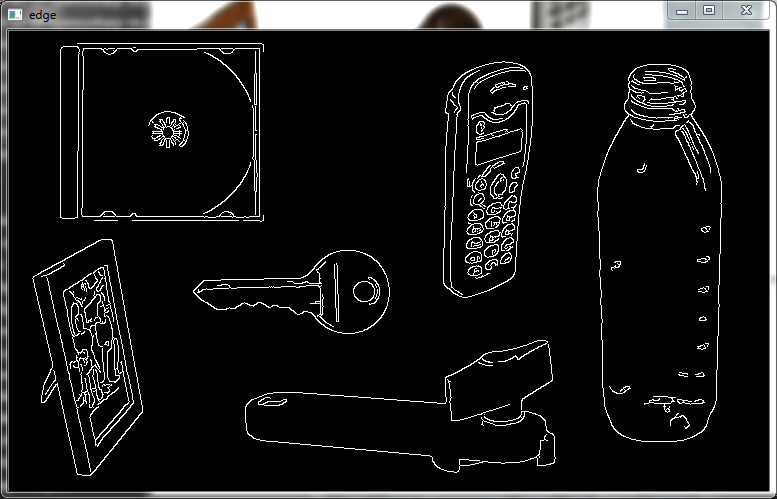
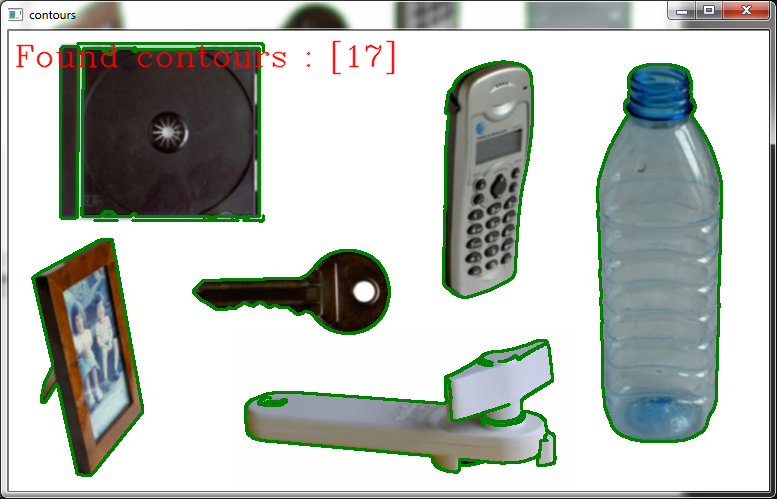
이번에는 총 17개의 Contour를 찾았음. Canny 인자에 따른 작용으로도 많은 차이가 발생한다.
마지막으로 위 이미지에서 Dilate와 Erode 적용해보자.
//to get better contour
Cv2.Dilate(edge, edge, new Mat(), null, 3);
Cv2.Erode(edge, edge, new Mat(), null, 1);
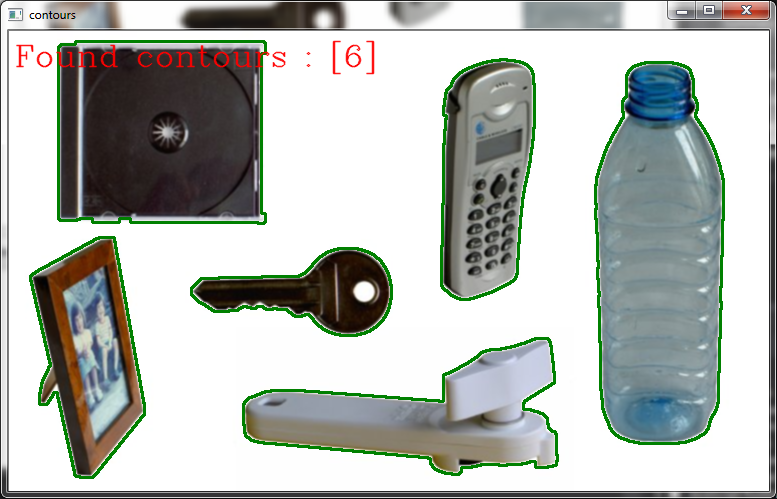
최종적으로 6개의 Contour를 확인 했음을 알 수 있다.
Morphological Operations 모폴로지 연산
침식과 팽창은 형태학 필터 중 하나로써, 각 화소 주변의 화소를 참고하여 연산을 하며, 정해진 크기, 모양의 구조 요소(Structuring Element)로 연산을 한다.
- 침식 : 이웃한 화소들 중 최소 화소값을 현재 화소값으로 대체한다.
- 팽창 : 이웃한 화소들 중 최대 화소값을 현재 화소값으로 대체한다.
OpenCV에는 침식, 팽창 연산이 이미 Erode, Dilate 함수로 구현되어 있다. 두 함수 모두 단일 채널 Mat 영상을 인자로 받으며, 사용자의 필요에 따라 연산을 수행할 커널의 크기를 정할 수 있다. 침식연산은 잡음 제거에 주로 사용하며, 팽창은 잡음 제거 후 줄어든 객체의 크기를 다시 원상복구 시키고자 할 때 주로 사용한다.
팽창과 침식 연산 두가지를 순서를 바꾸어가며 적용할 수 있는데, 아래와 같이 정의한다.
- 닫힘(Closed) : 팽창 - 침식, Closing is defined as the erosion of the dilation of the image.
- 열림(Opened) : 침식 - 팽창, Opening is defined as the dilation of the erosion of the image.
주로 노이즈를 제거 하기위해 사용되긴 하나, 시험한 결과로 보아 가장자리 경계선을 좀 더 명확하게 만드는데에도 효과적임을 알 수 있다.
Leave a comment