chapter 11. 객체 가장자리 사각형 그리기
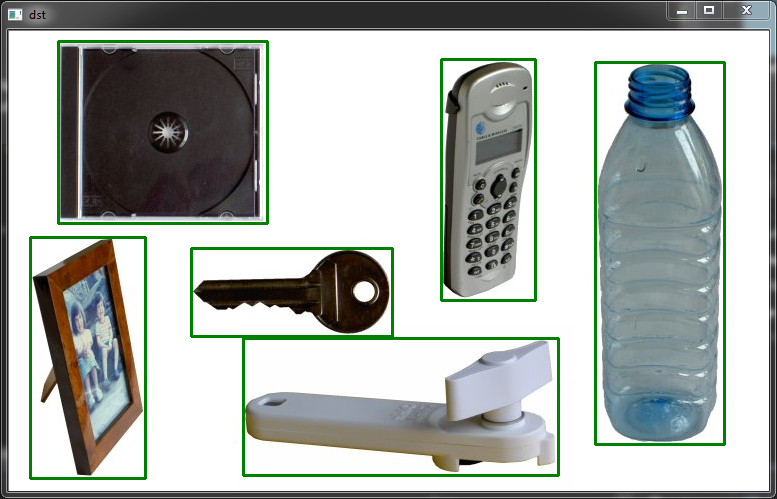
지난 시간 알아본 Find Contour에서 확인 된 객체를 인식 용이토록 사각형으로 그리도록 하자.
FindContours()함수까지 진행 사항은 동일하고, 이후 DrawContours() 함수 대신에 반복문을 사용해 그린다.
사각형 그리기
//image load 먼저 한 후,
Mat gray = new Mat();
Mat edge = new Mat();
//convert to gray
if (src.Channels() == 3)
{
Cv2.CvtColor(src, gray, ColorConversionCodes.BGR2GRAY);
}
else src.CopyTo(gray);
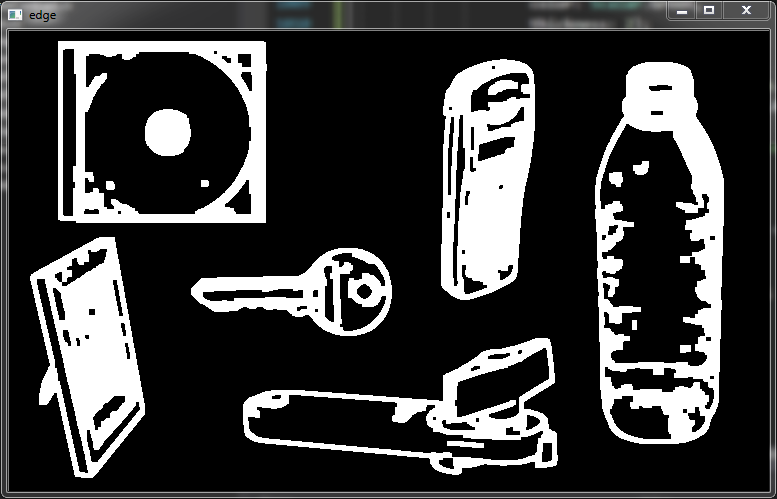
//edge
int threshold1 = (int)numericUpDownCannyThreshold1.Value;
int threshold2 = (int)numericUpDownCannyThreshold2.Value;
Cv2.Canny(gray, edge, threshold1, threshold2);
//to get better contour
Cv2.Dilate(edge, edge, new Mat(), null, 3);
Cv2.Erode(edge, edge, new Mat(), null, 1);
//find contours
Point[][] contours;
HierarchyIndex[] hierarchyIndexes;
Cv2.FindContours(
image: edge,
contours: out contours,
hierarchy: out hierarchyIndexes,
mode: RetrievalModes.External,
method: ContourApproximationModes.ApproxSimple);
//-- 위까지는 동일
var rectList = new List<Rect>();
foreach (var c in contours)
{
//skip too small obj
if (c.Length > 20)
rectList.Add(Cv2.BoundingRect(c));
}
foreach (var rect in rectList)
{
Cv2.Rectangle(
img: dst,
pt1: new Point(rect.X, rect.Y),
pt2: new Point(rect.X + rect.Width, rect.Y + rect.Height),
color: Scalar.Green,
thickness: 2);
}
using (new Window("edge", WindowMode.AutoSize, edge))
using (new Window("dst", WindowMode.AutoSize, dst))
{
//Wait until user finishes (space or esc)
while (true)
{
int c = Cv2.WaitKey(20);
if ((char)c == 27 | (char)c == 32)
{
SetDstImage();
Cv2.DestroyAllWindows();
break;
}
}
}
원 그리기
이건 나중에…
Leave a comment