chapter 5. 그리기 관련 함수들…
이번에는 간단한 그리기 함수들을 알아보도록 하겠습니다.
Drwing line, 선 그리기
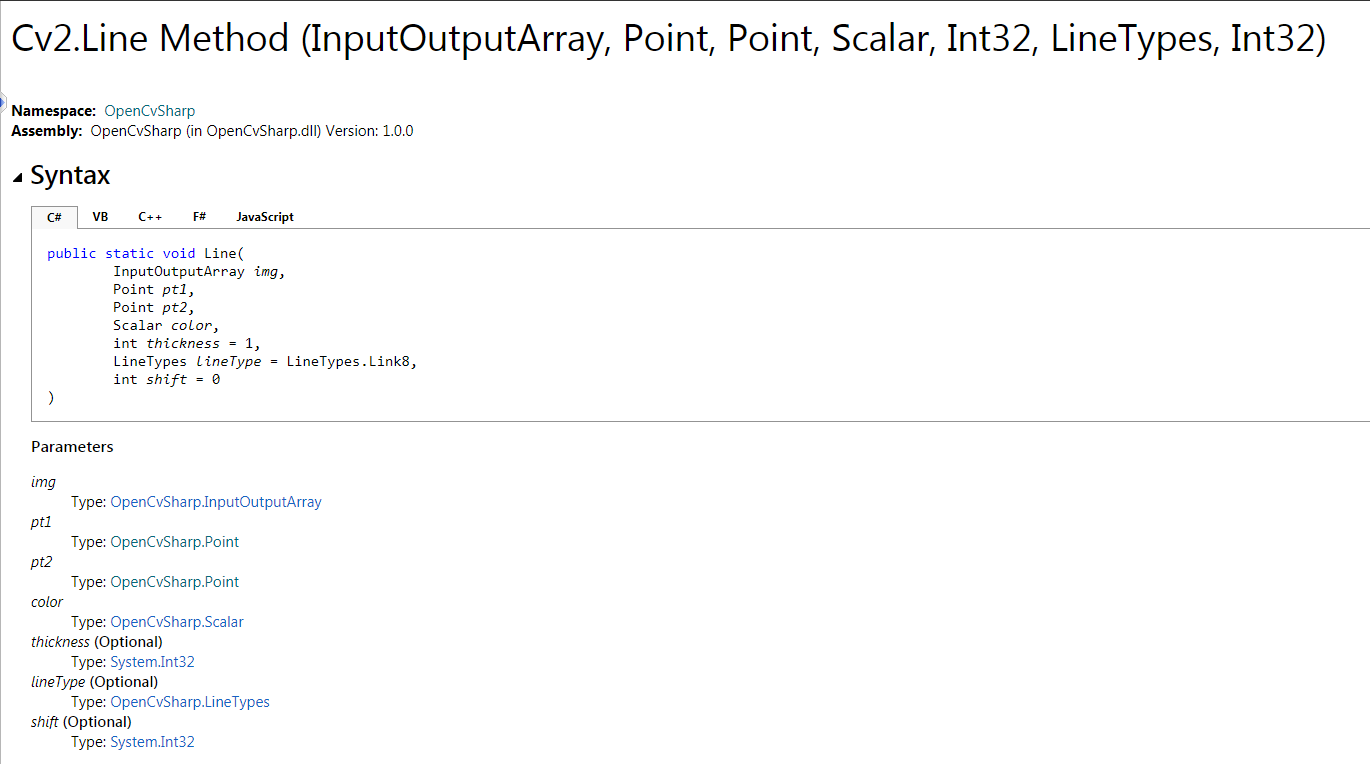
이미지에 선을 그리기 위해서는 Line()함수를 사용합니다. Line() 함수는 아래와 같이 2개의 오버로드가 있습니다. 좌표데이터(x위치, y위치)를 int로 지정하거나, point로 하거나의 차이 입니다.
- Cv2.Line(InputOutputArray, Point, Point, Scalar, Int32, LineTypes, Int32)
- Cv2.Line(InputOutputArray, Int32, Int32, Int32, Int32, Scalar, Int32, LineTypes, Int32)
함수 내용은 아래와 같습니다.
예제 코드
//drawing line
{
    Mat img = new Mat(500, 500, MatType.CV_8UC3);

    //red, thick3, antialias
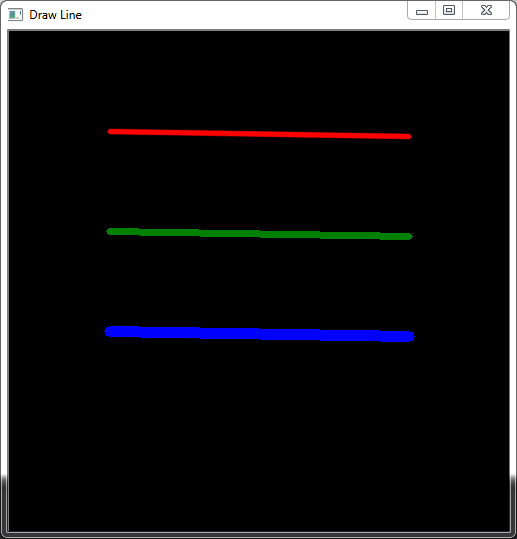
    Cv2.Line(img, (Point)new Point2d(100, 100), (Point)new Point2d(400, 105), Scalar.Red, 3, LineTypes.AntiAlias);
    //green, thick5, link4
    Cv2.Line(img, (Point)new Point2d(100, 200), (Point)new Point2d(400, 205), Scalar.Green, 5, LineTypes.Link4);
    //blue, thick10, link8
    Cv2.Line(img, (Point)new Point2d(100, 300), (Point)new Point2d(400, 305), Scalar.Blue, 10, LineTypes.Link8);

    using (new Window("Draw Line", img))
    {
        Cv2.WaitKey();
        Cv2.DestroyAllWindows();
    }
}
결과
drawing ractangle, 사각형 그리기
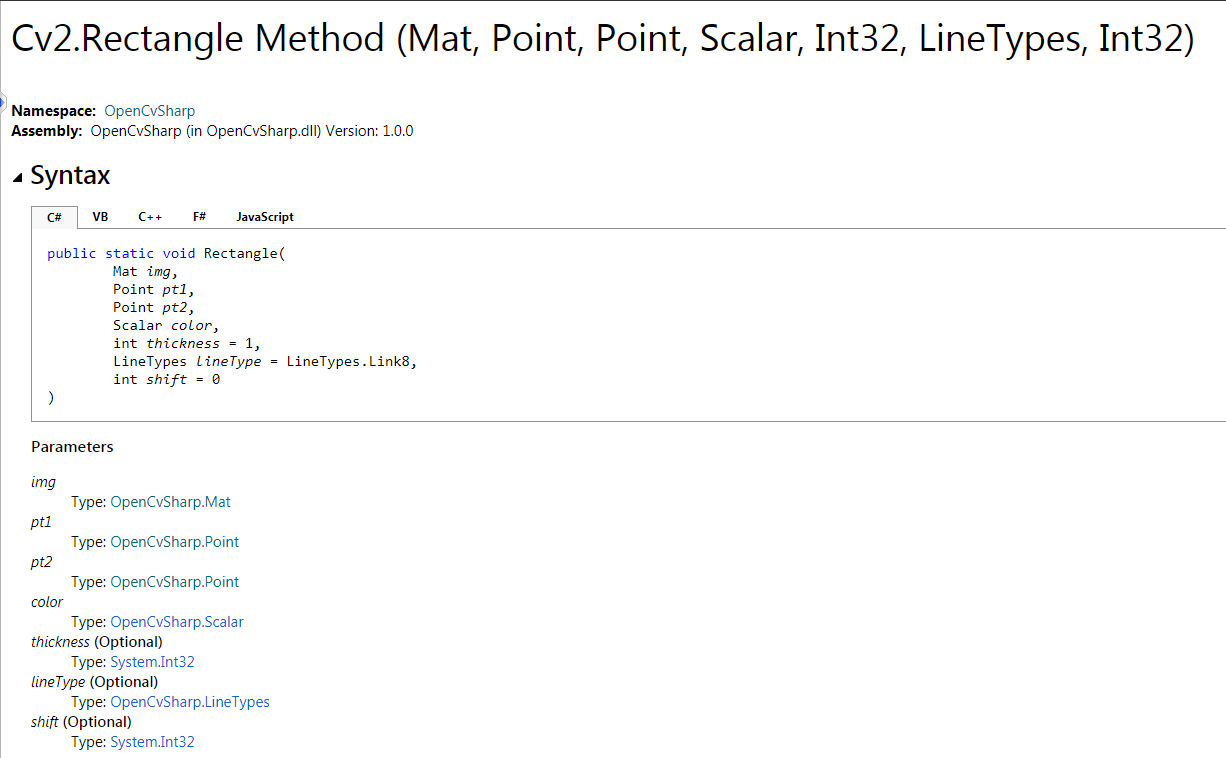
이미지에 사각형을 그리기 위해서 Rectangle( )함수를 사용합니다. Rectangle() 함수는 4개의 오버로드가 있습니다.
- Rectangle(InputOutputArray, Rect, Scalar, Int32, LineTypes, Int32)
- Rectangle(Mat, Rect, Scalar, Int32, LineTypes, Int32)
- Rectangle(InputOutputArray, Point, Point, Scalar, Int32, LineTypes, Int32)
- Rectangle(Mat, Point, Point, Scalar, Int32, LineTypes, Int32)
그중에 마지막 함수형을 알아보겠습니다.
예제 코드
//drawing ractangle
{
    Mat img = new Mat(500, 500, MatType.CV_8UC3);

    //red, thick3, link4
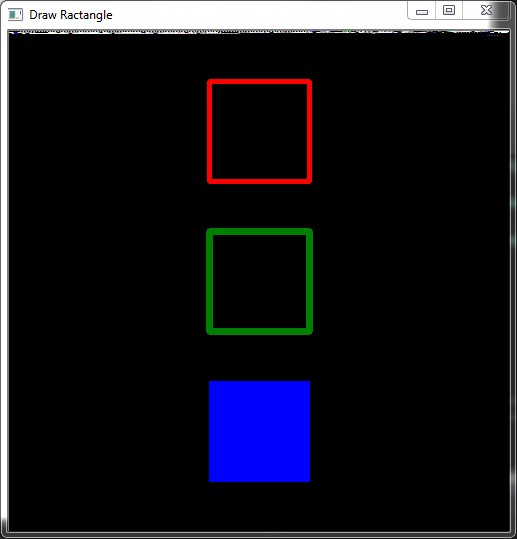
    Cv2.Rectangle(img, (Point)new Point2d(200, 50), (Point)new Point2d(300, 150), Scalar.Red, 3, LineTypes.Link4);
    //green, thick5, link8
    Cv2.Rectangle(img, (Point)new Point2d(200, 200), (Point)new Point2d(300, 300), Scalar.Green, 5, LineTypes.Link8);
    //blue, thick-1(fill), Antialias
    Cv2.Rectangle(img, (Point)new Point2d(200, 350), (Point)new Point2d(300, 450), Scalar.Blue, -1, LineTypes.AntiAlias);

    using (new Window("Draw Ractangle", img))
    {
        Cv2.WaitKey();
        Cv2.DestroyAllWindows();
    }
}
결과
Drawing Circle, 원 그리기
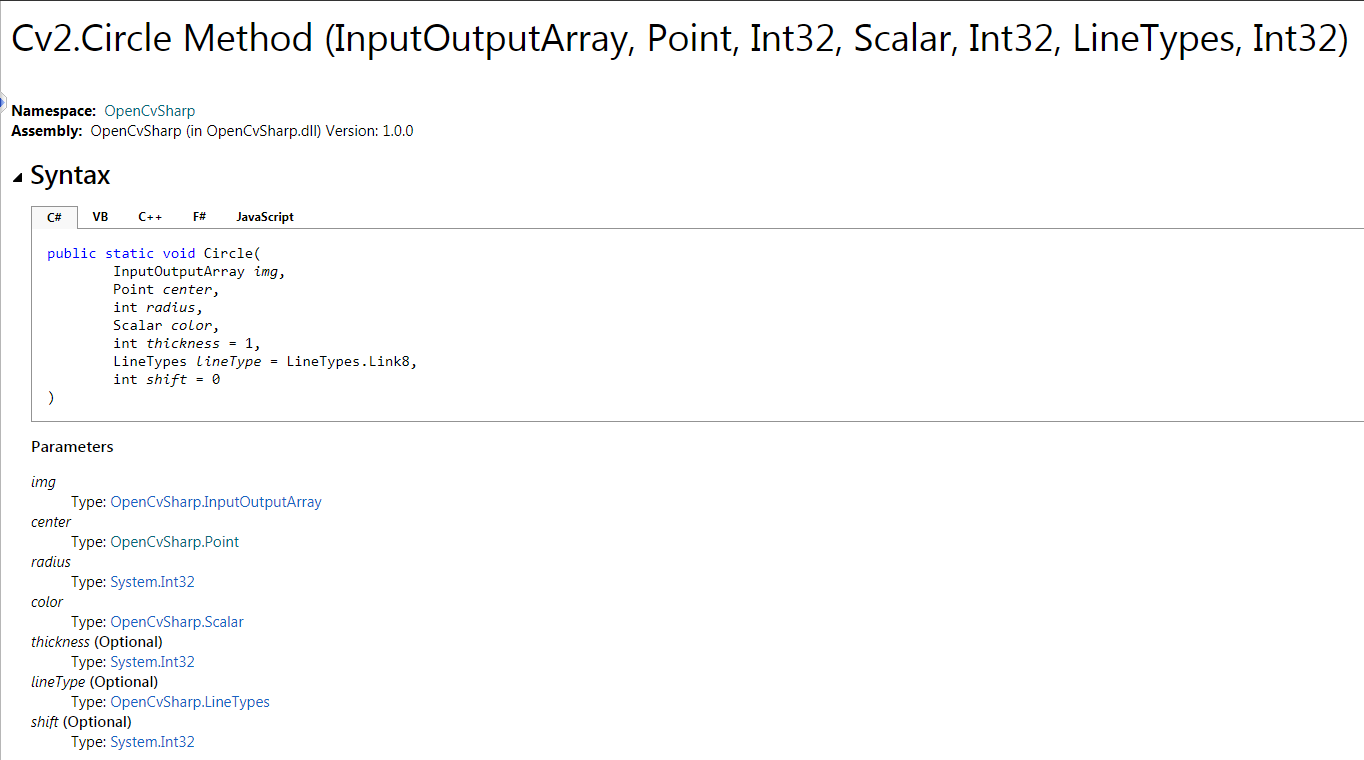
이미지에 원을 그리기 위해서 Circle()함수를 사용합니다. Circle() 함수는 2개의 오버로드가 있습니다.
- Circle(InputOutputArray, Point, Int32, Scalar, Int32, LineTypes, Int32)
- Circle(InputOutputArray, Int32, Int32, Int32, Scalar, Int32, LineTypes, Int32)
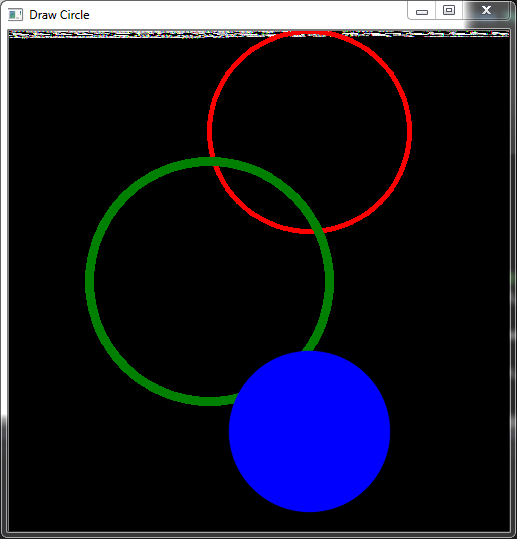
그중에 Point를 사용하는 함수형을 알아보겠습니다. 함수 인자로 원의 중심좌료, 반지름, 색상, 선두께, 선종류를 받습니다.
예제 코드
//drawing circle
{
    Mat img = new Mat(500, 500, MatType.CV_8UC3);

    //red - circle(이미지, 원의 중심 좌표, 반지름, 색상, 선두께, 선종류)
    Cv2.Circle(img, (Point)new Point2d(300, 100), 100, Scalar.Red, 3, LineTypes.Link4);
    //green
    Cv2.Circle(img, (Point)new Point2d(200, 250), 120, Scalar.Green, 8, LineTypes.Link8);
    //blue
    Cv2.Circle(img, (Point)new Point2d(300, 400), 80, Scalar.Blue, -1, LineTypes.AntiAlias);

    using (new Window("Draw Circle", img))
    {
        Cv2.WaitKey();
        Cv2.DestroyAllWindows();
    }
}
결과
Drawing ellipse, 타원형 그리기
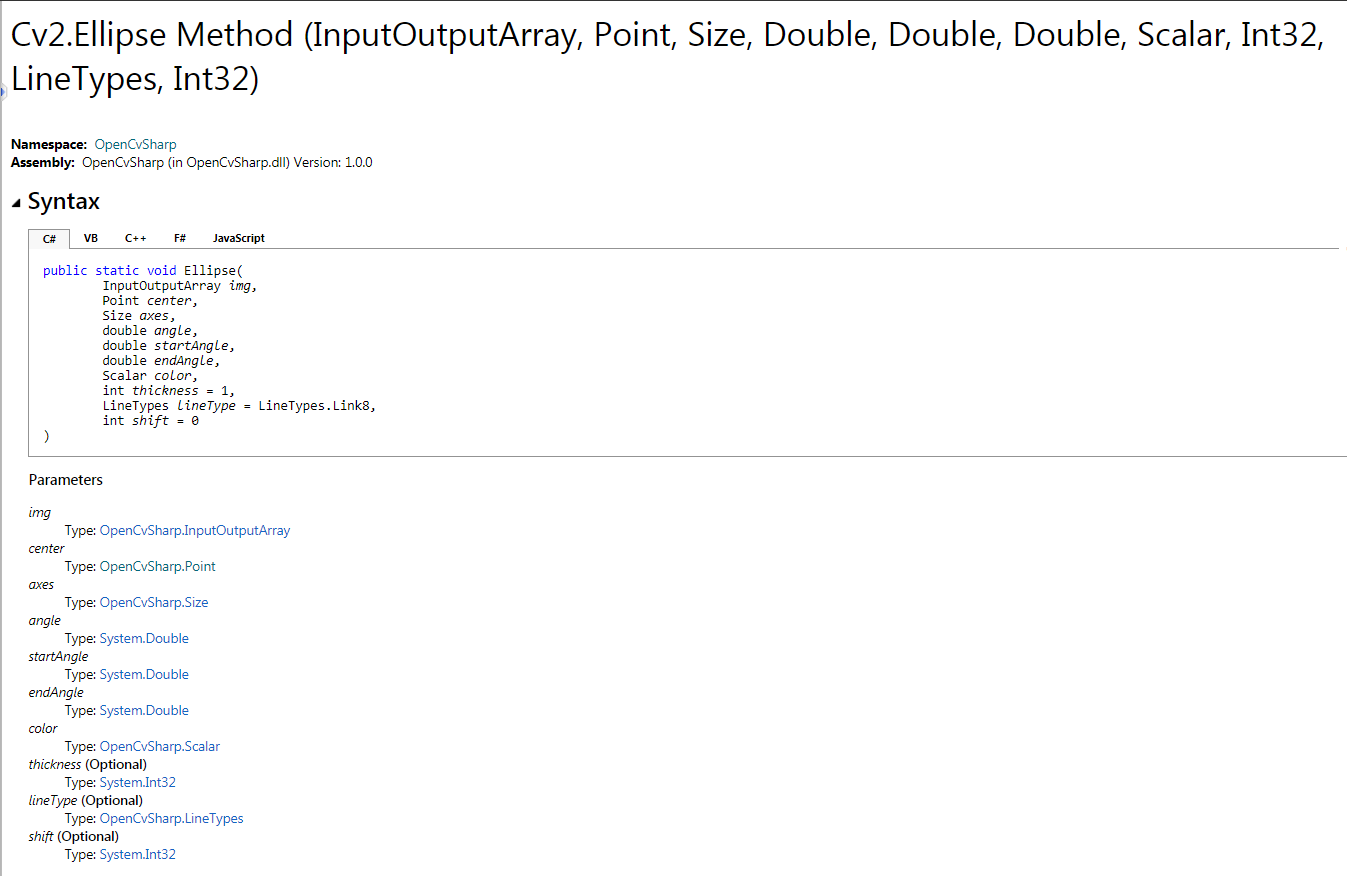
이미지에 타원형을 그리기 위해서 ellipse()함수를 사용합니다. ellipse() 함수는 2개의 오버로드가 있습니다.
- Ellipse(InputOutputArray, RotatedRect, Scalar, Int32, LineTypes)
- Ellipse(InputOutputArray, Point, Size, Double, Double, Double, Scalar, Int32, LineTypes, Int32)
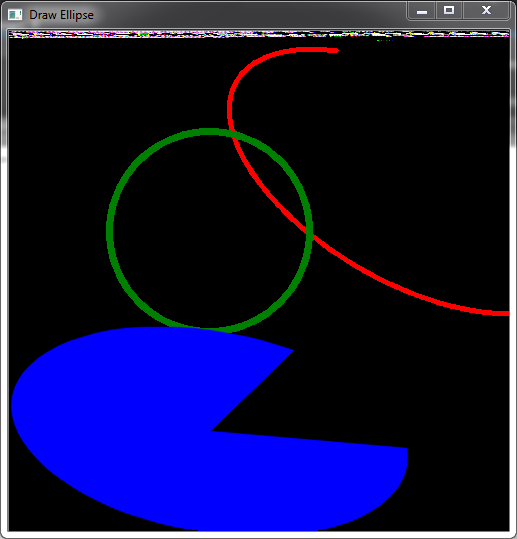
그중에 Point를 사용하는 함수형을 알아보겠습니다. 함수인자로 원의 중심좌료, 회전각도, 호시작각도, 호종료각도, 색상, 선두께, 선종류를 받습니다.
예제 코드
//drawing ellipse
{
    Mat img = new Mat(500, 500, MatType.CV_8UC3);
    double angle;

    //ellipse (이미지, 중심좌표 (장경·단경), 회전각도, 호 시작각도, 호 종료각도, 색상, 선두께, 선종류)
    //red, thick3, link4
    angle = 30;
    Cv2.Ellipse(img, (Point)new Point2d(400, 150), (Size)new Size(200, 100), angle, angle - 100, angle + 200, Scalar.Red, 3, LineTypes.Link4);

    //green, thick5, link8
    angle = 0;
    Cv2.Ellipse(img, (Point)new Point2d(200, 200), (Size)new Size(100, 100), angle, angle, angle + 360, Scalar.Green, 5, LineTypes.Link8);

    //blue, thick-1, antialias
    angle = 100;
    Cv2.Ellipse(img, (Point)new Point2d(200, 400), (Size)new Size(100, 200), angle, angle - 200, angle + 100, Scalar.Blue, -1, LineTypes.AntiAlias);

    using (new Window("Draw Ellipse", img))
    {
        Cv2.WaitKey();
        Cv2.DestroyAllWindows();
    }
}
결과
이상으로 간략히 그리기 함수를 알아보았습니다. 마지막으로 글자 쓰기를 알아보겠습니다.
Drawing Text, 문자 쓰기
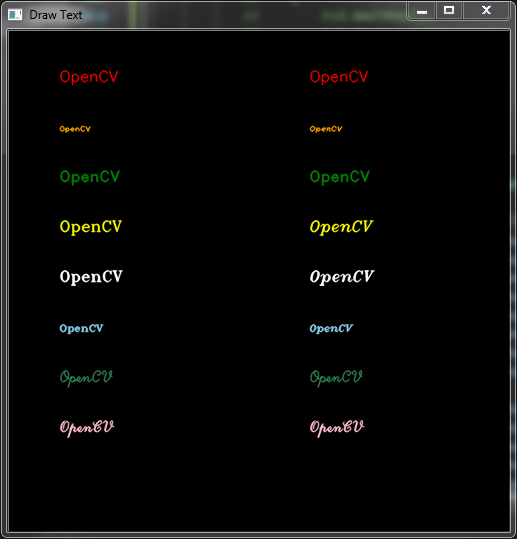
문자를 쓰기 위해서는 Font를 사용합니다. 먼저 OpenCV에서 사용하는 Font를 알아보겠습니다. 기본적으로 HersheyFonts 가 있습니다. 종류는 아래와 같습니다.
public enum HersheyFonts
{
    HersheySimplex = 0,         //normal size sans-serif font
    HersheyPlain = 1,           //small size sans-serif font
    HersheyDuplex = 2,          //normal size sans-serif font (more complex than HERSHEY_SIMPLEX)
    HersheyComplex = 3,         //normal size serif font
    HersheyTriplex = 4,         //normal size serif font (more complex than HERSHEY_COMPLEX)
    HersheyComplexSmall = 5,    //smaller version of HERSHEY_COMPLEX
    HersheyScriptSimplex = 6,   //hand-writing style font
    HersheyScriptComplex = 7,   //more complex variant of HERSHEY_SCRIPT_SIMPLEX
    Italic = 16                 //flag for italic font
}
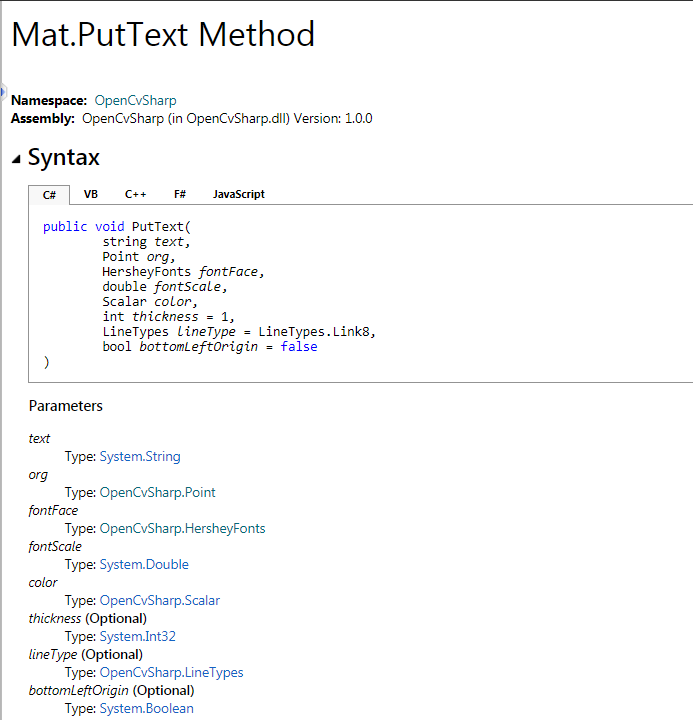
OpenCV에서 글자를 쓰기위해서는 PutText() 함수를 사용합니다. 함수 내용은 아래와 같습니다.
예제 코드
//drawing text
{
    #region fonts
    //public enum HersheyFonts
    //{
    //    HersheySimplex = 0,         //normal size sans-serif font
    //    HersheyPlain = 1,           //small size sans-serif font
    //    HersheyDuplex = 2,          //normal size sans-serif font (more complex than HERSHEY_SIMPLEX)
    //    HersheyComplex = 3,         //normal size serif font
    //    HersheyTriplex = 4,         //normal size serif font (more complex than HERSHEY_COMPLEX)
    //    HersheyComplexSmall = 5,    //smaller version of HERSHEY_COMPLEX
    //    HersheyScriptSimplex = 6,   //hand-writing style font
    //    HersheyScriptComplex = 7,   //more complex variant of HERSHEY_SCRIPT_SIMPLEX
    //    Italic = 16                 //flag for italic font
    //}
    #endregion

    Mat img = new Mat(500, 500, MatType.CV_8UC3);

    // 텍스트, 위치(좌표), 글꼴, 크기, 색상, 두께(옵션), 종류(옵션)
    img.PutText("OpenCV", (Point)new Point(50, 50), HersheyFonts.HersheySimplex, 0.5, Scalar.Red, 1, LineTypes.AntiAlias);
    img.PutText("OpenCV", (Point)new Point(50, 100), HersheyFonts.HersheyPlain, 0.5, Scalar.Orange, 1, LineTypes.AntiAlias);
    img.PutText("OpenCV", (Point)new Point(50, 150), HersheyFonts.HersheyDuplex, 0.5, Scalar.Green, 1, LineTypes.AntiAlias);
    img.PutText("OpenCV", (Point)new Point(50, 200), HersheyFonts.HersheyComplex, 0.5, Scalar.Yellow, 1, LineTypes.AntiAlias);
    img.PutText("OpenCV", (Point)new Point(50, 250), HersheyFonts.HersheyTriplex, 0.5, Scalar.White, 1, LineTypes.AntiAlias);
    img.PutText("OpenCV", (Point)new Point(50, 300), HersheyFonts.HersheyComplexSmall, 0.5, Scalar.SkyBlue, 1, LineTypes.AntiAlias);
    img.PutText("OpenCV", (Point)new Point(50, 350), HersheyFonts.HersheyScriptSimplex, 0.5, Scalar.SeaGreen, 1, LineTypes.AntiAlias);
    img.PutText("OpenCV", (Point)new Point(50, 400), HersheyFonts.HersheyScriptComplex, 0.5, Scalar.Pink, 1, LineTypes.AntiAlias);

    img.PutText("OpenCV", (Point)new Point(300, 50), HersheyFonts.Italic | HersheyFonts.HersheySimplex, 0.5, Scalar.Red, 1, LineTypes.AntiAlias);
    img.PutText("OpenCV", (Point)new Point(300, 100), HersheyFonts.Italic | HersheyFonts.HersheyPlain, 0.5, Scalar.Orange, 1, LineTypes.AntiAlias);
    img.PutText("OpenCV", (Point)new Point(300, 150), HersheyFonts.Italic | HersheyFonts.HersheyDuplex, 0.5, Scalar.Green, 1, LineTypes.AntiAlias);
    img.PutText("OpenCV", (Point)new Point(300, 200), HersheyFonts.Italic | HersheyFonts.HersheyComplex, 0.5, Scalar.Yellow, 1, LineTypes.AntiAlias);
    img.PutText("OpenCV", (Point)new Point(300, 250), HersheyFonts.Italic | HersheyFonts.HersheyTriplex, 0.5, Scalar.White, 1, LineTypes.AntiAlias);
    img.PutText("OpenCV", (Point)new Point(300, 300), HersheyFonts.Italic | HersheyFonts.HersheyComplexSmall, 0.5, Scalar.SkyBlue, 1, LineTypes.AntiAlias);
    img.PutText("OpenCV", (Point)new Point(300, 350), HersheyFonts.Italic | HersheyFonts.HersheyScriptSimplex, 0.5, Scalar.SeaGreen, 1, LineTypes.AntiAlias);
    img.PutText("OpenCV", (Point)new Point(300, 400), HersheyFonts.Italic | HersheyFonts.HersheyScriptComplex, 0.5, Scalar.Pink, 1, LineTypes.AntiAlias);


    using (new Window("Draw Text", img))
    {
        Cv2.WaitKey();
        Cv2.DestroyAllWindows();
    }
}
결과
마지막으로 문자 그리기 까지 알아보았습니다.
Leave a comment